 Part of Robot Dairies project was delivery of series of workshops engaging young people and allowing them to experience potential & possibilities of self-expression through VR.
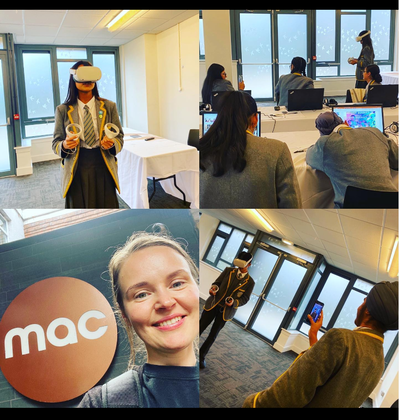
With over half of planned workshops under the belt here is the little post reflecting on the delivery so far. When I set myself off for a task of developing Robot Diaries workshops I initially wanted to involve few groups of the same young people in a series of workshops. I thought that in this way I’ll give participants an opportunity to deepen their learning. However, when running this idea through partnership organisations who were helping me to engage with schools and youth groups I’ve quickly realised how tricky it is to organise recurring group. It became apparent that the workshop has to be contained within one day. Initially I thought it might be quite tough to be able to teach the essentials of 3D and world building in one day but as I started talking to other digital artists who worked in educational settings I realised that I’m wrong. Technology is native to young people nowadays and they are picking up skills much quicker than I’ve anticipated. Also it was down to workshop planning to develop content that would be easy enough to grasp but with option of adding complexity. Armed with this aim I’ve developed a one day workshop where in the morning students get to experience the immersive world of Robot Diaries and in the afternoon they get to create their own VR worlds. Throughout the morning I’ve planned to use one headset and rest of the group would use laptops while headset is being rotated through the group. It’s hard to manage several headsets at the same time, especially when someone is using it for the first time. Guiding through navigation and making sure that experience is loaded correctly requires assistance. I was looking to multitask a bit helping students with getting on with VR headset and crawd managing rest of the students in the immersive experience who were using laptops. In this way I had one student at the time to set up with VR while others with laptops got on with tasks set up for them in Robot Care Centre. I’ve asked students to work together at the same peace walking through the labyrinth of the Robot Care Centre. I decided to gently guide them and pick their brains on how they are progressing through the story to aid their listening skills and to make sure they understand and follow the instructions. This has proved to work quite well. Depending on the group they were a bit shy at the start but the moment VR headset was going around the involvement and excitement escalated and made them more involved. Once students experienced the world of Robot Diaries I started to introduce them to Mozilla Hubs Spoke online editor. After the intro to navigation of the tool I’ve tasked them with the first goal: creating their own room which would be a part of Robot Care Centre. Then I’ve introduced them to a few ways they can improve their space and make it their own. The exciting part of this task was the ability to view the creations in VR and showing them to fellow students and using these spaces to meet. They certainly were not bored and loved experiencing their own creations in VR. I’ve also shared knowledge with them how they can access the tool and their rooms in the future if they would like to keep working on it. Leaving them with opportunity to build on what they created. Even though at the start I was worried about workshop content and delivery in such a short time it proved to work well. I also had opportunity to work with one group over series of workshops which made me realised how quickly they were able to progress through tasks and that new and more challenging tasks had to be provided. One day definitely works well but I keep learning and altering the content to keep students interested. For example recently I’ve added a bit of guessing game through which they learn about different roles within the gaming industry. A bit of an ice breaker to start with which showed that game developers are not the only ones that are involved in game creation and there is plenty of room for artists ;)
2 Comments
So let’s talk DIY face mocap. I was looking to record videos showing digital avatar that would use face mocap. I’ve explored a few options in terms of avatar and face mocap. My first tool to try was Unity as it’s most familiar to me. I found a workflow that used Unity SDK, an iPhone’s true depth camera and a Ready Player Me avatar. Using Ready Player Me allowed for a certain degree of customisation, you can choose from an already existing repository of bodies, clothes and features.
The other option I eventually decided to go with was using Replica AI, the solution has been presented to me by my collaborator Miguelangelo Rosario. He’s been experimenting with creating a different character for the project but as the results were quite good I decided to test this solution. First, we worked on getting the avatar polished, we used Reallusion software. Reallusion gives options for full customisation, options are endless, you can change body shape, materials, and literally everything about the avatar. Once the avatar was nailed we started to experiment with lip sync using Replica AI. In this solution, we didn't need to rig the avatar as Replica AI is a lip sync solution meaning it has a repository of lips shapes for words and creates facial movement and expression based on that. The only things left to do is decide on: voice, expression and checking that the text is understandable to AI. The first version of AI interpretation didn’t come out well at all, it was jumbling words together and some words were not clearly pronounced. Based on the results I’ve re-written the text to make sure that the words used can be understood and that there are no log sentences and that there is plenty of punctuation. It took a day of listening and revising the text but once completed the results were good. One thing to bear in mind is that as with any lip sync solution the expression can be a bit robotic, however for my project that was an added benefit. I keep hearing good things about metahumans in Unreal, however, these have a smaller degree of customisation and it’s pretty much impossible to make an alien character as they are all humanoid. Despite that I’m definitely up for trying face mocap with metahumans as they look amazing, will surely report on the results here ;)
 Robot Diaries is well underway and I’ve been due to share a little bit about my learnings on technology I’ve been using. For this project, I chose to work with Mozilla Hubs. If you haven’t heard about it, it is a web-based tool which is used to collaborate in private 3D visual spaces. I decided to work with it as currently, it’s the only software to view VR spaces simultaneously on PCs and VR headsets. Moreover, Mozilla Hubs also has its free world-building software Spoke. In cases where you don’t have many headsets kicking about and would like to use a PC to access VR, it is a pretty good tool. Especially as it is web-based, so the only limitation in terms of access is wifi’s bandwidth. When planning Robot Diaries I wanted to make sure that I can provide workshops where participants not only immerse themselves in the VR world but also get their hands dirty and create their own VR spaces. As software like Blender or game engines have a high learning curve that didn't seem like an option, hence my final decision was to go with Mozilla’s Hubs. In terms of creating for Mozilla Hubs, it comes with a repository of architecture elements so you can start building straight away. It also has elements like lighting, spawn points, audio, and even particle emitter. You can plugin objects from Sketchfab (online repository of 3D objects). However, as fantastic as it sounds it is an online tool so there are certain limitations. I’m going to warn you here, I’m about to get a little bit technical. Firstly, projects have a limit of 128 MB, and then there are limits on polygon count, lighting, materials and textures. Might sound quite limiting but even if you end up going over some of the limits on these you might still manage to publish your work onto Mozilla Hubs. To keep yourself in check you might want to publish your created space as you go along to keep checking your stats. Especially, when working with objects from Sketchfab, these are not optimised for Mozilla Hubs and often are way over polygon count. Small tip when searching for objects on Sketchfab select downloadable, type in ‘low poly’ and you can check the triangles count of the object in the description. Another thing to help with the optimisation of the experience is to make sure lights and shadows are ‘baked in’. This especially applies to objects brought into Spoke for example from Sketchfab. To bake in lights, materials and textures you’ll need to use other software like Blender. It is worth mentioning here that the way things look on a PC might differ from the headset. So again, keep testing as you build to check how the lighting, materials and textures work across platforms. However, if you stick with low poly objects and you’re mindful of all the limitations you should be fine. Another workaround in terms of bringing more complex objects is placing them into the scene once the scene has been created and published. Objects need to be pinned in the scene otherwise they will disappear. Another great thing about Mozilla Hubs is placing videos and media content in VR spaces. Again there are limitations on what you can bring as it is an online tool and if using YouTube and these two programs would need to connect for the video to work. I found that not all videos would play especially those with high resolution, so again you might need to test as you go along or otherwise download the media and place them as a file using Spoke. There is probably loads more I don't know about but I found this useful guide with further troubleshooting in case you're interested: https://cpb-ap-se2.wpmucdn.com/blogs.auckland.ac.nz/dist/b/596/files/2019/04/DRH-SPOKE-DRAFT.pdf Well let’s face it you’ll not build first-world graphics using this tool but for what you get I think it’s pretty good: free VR spaces for up to 25 participants, an online-based easy to use editor, pc and VR headset accessibility. For purpose of Robot Diaries it's been a great tool, however, limitations on graphics have caused me some serious troubles but it's all a learning experience ;)  .I've got big news, I'm currently working on the next VR project called Robot Diaries. I secured funding a few months back but as I had a big change in my personal life - I gave birth to a baby girl - I’ve been working at a slightly slower speed than usual ;) However, as a lot of progress has been made in the last couple of months I really want to share more about this new exciting venture! It is ACE funded project which aims to deliver a series of workshops for young people teaching them about VR. I've partnered up with Midlands Arts Centre for workshop delivery and in September I'll be delivering the first workshops
As part of the workshops, I’m developing a storytelling experience in Mozilla Hubs. The story is inspired by Stanislaw Lem’s Sci-Fi literature. In the story, participants get to visit an abandoned Robot Care Centre and they find robots who need help and have different tasks to assist them. During workshops, participants get to explore and interact with the world of the robots using Oculus and laptops. They also get to develop their VR skills as they will learn about Spoke which is Mozilla Hubs' own tool for world-building. I’m currently working through final revisions of the story and also polishing of world of robots in Mozilla Hubs. I have been lucky to be able to work with Dyspla studio on script edits and character development. I’m using face mocap in this project to record some of the characters and as always I’ve been DIYing and testing different low-budget solutions, will share my findings on this soon. I also want to mention two other great artists that have been on this journey with me recently. I’ve been working on world-building in Mozilla Hubs with Miguel Rosario Cyberartist and Amoeba. Also ’ve been learning Spoke as we worked along and even with being fluent in game engines there has been some learning curve but my adventures with Mozilla Hubs are a story for a different time. After over a year of research and development Sensosis is now available to download from SideQuest. Here is a quick video teaser of the experience:  SideQuest link:
https://sidequestvr.com/app/3369/sensosis For now it is available for download only with a headset however I’m currently working with a local gallery to make the experience available to the public. Apart from sharing with you news that Sensosis is now live I thought in this post I’ll share with you some of the insights on the final weeks of the project. As you can see from my previous posts I had a very hands-on experience throughout the project. I might have mentioned somewhere that a large proportion of my learning was learning Unity engine (separate post on that is coming). Unity was my daily bread and butter in the final weeks of the project. However, not everything was going smoothly. Main issue I’ve come across was with one of the materials. In Unity everything worked perfectly however it wasn’t the case when viewed in Oculus. Despite countless hours of searching online for a solution as well as asking around there was no easy way to fix it other than msking the asset from theb scratch. Thankfully I had a great team of creatives who I worked together with me on fixing this issue, big shout out to Tran3D: https://taran3d.com/ and Ryan Garry: https://www.unlimitedmotion.ltd/ One take away from this is to always test the development in Oculus as it might look very different from what’s in Unity! Once issues were resolved and final touches on the 3D environment completed VR experience was ready to be shown to the audience. Due to covid the initial plan to display the piece in the gallery changed to online deployment. I’ve chosen SideQuest platform as it is easiest to publish by indie developers and also as it is widely used by headset owners. I won’t lie that as it was my first ever app deployment it didn’t go without a few hiccups. However, SideQuest support is excellent and assisted me in resolving the issues, so I can definitely recommend this platform for anyone looking to deploy their VR apps and games. With the app ready to be viewed I’m working on getting it out there: submitting it to XR festivals, sorting out the gallery exhibition and spreading the word ;) Also another thing I’ve been considering from the start is bringing the whole experience into VR Chat, so watch this space as you might get to meet the alien in real time ;)
Achieving high-level fidelity motion-capture performance is not easy and in order to get to perfect motion capture clean up is required. However, having said that I found that there are ways to work around it. A perfect example of it is VR performance of Tempest by Tender Claws. I was very intrigued by it as it’s been advertised as an immersive theatre with live interaction with an actor. The way that the show got around the motion capture issue is that it didn’t intend to use high fidelity movement. Instead, actors used tracking that is within the headset, so the headset can detect movement in space and hands movement and the voice can be directly streamed through the microphone in the headset. The avatars were simple but worked together with the rest of the environment. The audience had even simpler shadow like avatars with hands which allowed for interaction with the environment. The actor navigated the audience through the story and asked for participation in key parts where the audience either collected objects or enacted scenes by simple physical gestures. Bottom line is that this sort of interaction worked, it was real-time performance that didn’t have full motion capture but sometimes the simplest of solutions work best which the show proved. I’ve heard that similarly simplified avatars are used to design performances in Mozilla Hubs and VR chat. I’m currently exploring these so more to come on live events on VR social platforms.
One thing that I haven't mentioned so far is environment creation. This post is going to be longer than others but believe me I tried to keep this simple… Whether you are creating virtual reality experience or a game it requires worlds and objects for the audience to explore and experience. The environments can be complex and expansive or totally opposite. It is really exciting to know that anything can be created, whether it is an environment as we know it like forest, city or an imaginary planet. However, as tempting it can be to let the imagination loose it is useful to learn a bit more about how 3D assets are created. My first environment creation experience has been using Tilt Brush, it is a program used within headset to create 3D paintings and sculptures. There are also few other programs working on similar premises like Microsoft Maquette or Gravity Sketch. Benefit of using these types of programs is that the creator is wearing a headset while painting therefore they can experience the sketch in 3D. They can move around, see it from different perspectives and decide what angle they would like the audience to see the sketch from.
One thing to mention at this stage is that even though these tools are great for 3D assets creation once assets are imported into the game engine they might not have the same look and feel as they did within the painting software. This is particularly apparent with Tilt Brush, brushes have different colours and often animations which might not look the same in the game engine. Also when painting in the software you set certain lighting and this lighting will be different within the game engine. However, there is a way around it, it is possible to adjust settings in Unity to get Tilt Brush SDK and then the majority of brushes have the same look and feel. Something to consider is creation of a base sculpture and application of mesh (the colour of the sculpture) separately. If you decide to go down this route you might want to consider using Substance Painter. This software allows you to choose from many existing textures, colours, materials but also you can paint over the sculpture to decide on it’s look. You can also download free meshes from 3D texture website.
I should also mention that 3D assets creation can be done without use of a headset. There are many programs to create 3D assets and meshes amongst them: a SketchUp, Blender, Maya, Autodesk 3D. It might take some time to upskill, it is really a discipline in itself but programs like Tiltbrush are relatively easy to use. However, if the idea of 3D painting or using any sort of 3D modelling software scares you but you still would like to try and create your own world, don’t worry there are many free and affordable 3D assets available online. These can be imported directly into the game engine from Poly, Sketchfab or TurboSquid. There are many assets available from environment building ones like furniture or trees, to spaceships and Mars craters. So, probably before being carried away with making crazy worlds it is worthwhile to think how the audience will be exploring them, will they be static or able to walk around? Would they be able to interact with any of the objects? What will happen if they walk into the object? Deciding on what you want your audience to see and how they will be able to explore the environment will help you decide on the contents of the world you want to create. Afterall there is no point of making an entire galaxy if audience is within windowless spaceship. I would definitely advice playing around with free assets in the game engine to understand how mesh and objects are brought together, there are many YouTube videos explaining how to do this. I would also recommend learning about creating skyboxes which is basically a sky that the audience will see, again YouTube is a great resource for that. This should give you basic abilities to create big or small worlds! 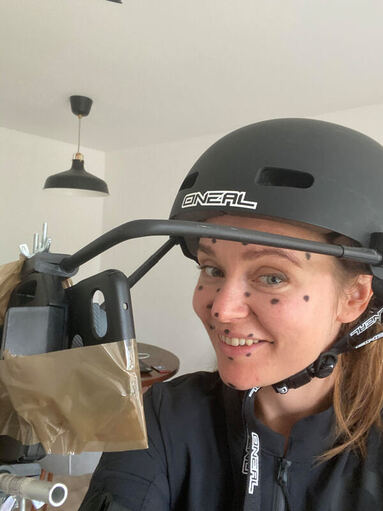 Since the beginning of lockdown I’ve been worried about motion capture of my performance. With no facilities open and people not willing to travel it’s been hard to figure out an alternative that I could use.
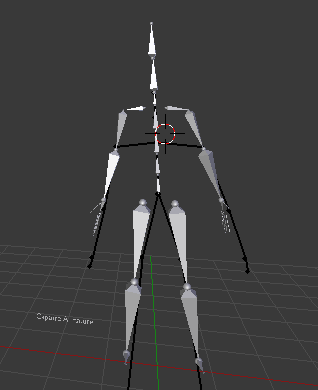
First I started from testing home made solutions using Kinect. It’s not very hard to set up and is quite cheap technology. Second hand Kinect together with the appropriate cable comes to about £50. To make Kinect work with computers there is also software that has to be downloaded: Kinect SDK. When Kinect is connected to the computer in order to activate it SDK Kinect Configuration has to be run. Once the Kinect is recognised by computer the red light on it will light up. Now as Kinect is connected we need to set up other software that would actually recognise that we are capturing motion. Kinect is equipped with a true depth camera which means that it captures a surface of everything that is in front of it. Meaning it will capture the entire room, so it will need to be directed to what it is supposed to be capturing.To do that I used Brekel’s software: https://brekel.com/body_v2/ In order for Kinect to work well, the performer has to keep a certain distance from Kinect and also cannot come out of the scope of the camera. Also more complicated movements won’t be captured. Actions should be simple and defined. Despite that I’ve kept motion to minimum I found that the animation captured was a bit messy. One of the legs moved in a completely different way than intended. I’ve made quite a few tests and came to the conclusion that when using Kinect there have to be post processing applied in order to fix the animation. However, the amount of post processing can be so extensive that it is better to capture the motion with other solution. Especially as post processing is done with using Maya or Motion Builder which are quite costly. I’ve decided to go back to my initial test I did with geospatial suits: Neuron and Rokoko. With lockdown easing I started to think how I can get my hand on any of them. Luckily some time ago I met Ryan Garry from Unlimited Motion. He owns a Rokoko suit and also a Leap motion tracker for capturing hands. He also has experience with face motion capture which I’ll mention in a separate entry. I managed to book sometime with Ryan and decided that we will capture the performance at my home. That’s the beauty of geospatial mocap solutions; they can be used anywhere, as long as there is not much disturbance which comes from metal. We’ve spent a few hours capturing the performance and discussing post processing and how hands,body and face will be put together. Also there has been a bit of a learning curve for me in terms of performance with mocap suit and camera but that's the essay on it’s own. Now as the performance is captured different animations have to be put together: body, face and hands. This will take some time but I’m looking forward to seeing the first draft ;) There are quite a few options to create avatars, some do it in Blender, those with Maya license use Maya, there is also Makehuman and Fuse amongst other options. Currently Adobe Cloud has been offering free creative cloud service, so I’ve decided to use Fuse which is their product. Another factor is Fuse’s integration with Mixamo which is a website which rigs the avatar. Rigging attaches a skeleton to the character which then can be animated. Without skeleton animation can’t reference the avatar and it simply wouldn’t know what to animate. Not all characters might have standard humanoid skeletons for example monsters or animals. Non humanoid avatars would require bespoke rigging which would outline the structure of their skeleton. 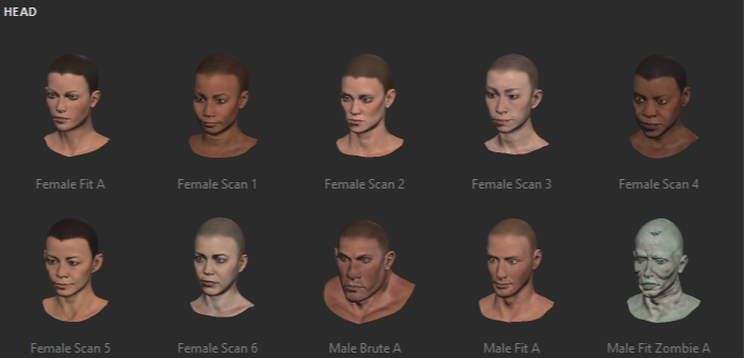 To create a rig it is necessary to connect the bones of the skeleton mirroring all the limbs. Skeleton has to mirror the structure of the body for example if a monster has six legs then skeleton should as well. Also all the parts of the body that we wish to move with animation have to have bones attached to them, for example if we wish to move fingers then each finger has to have all the bones. To mirror a human-like hand that would be three bones per finger and five bones in the palm. As you imagine, creating a rig which would be as complex as a human skeleton, which has 206 bones, can be quite time consuming. Hence there are solutions simplifying this process. Miximo is a website where you can upload an avatar and a simple rig would be added to it. In order to experiment with animation and to learn about mocap this will be enough. Once a character is uploaded to Mixamo then the rig has to be attached. For each center point of the skeleton like legs, arms, head there are center points that have to be mapped. This can be done by dragging them into the correct space in the avatar. Once this is done the character can be downloaded and it is ready to be used. 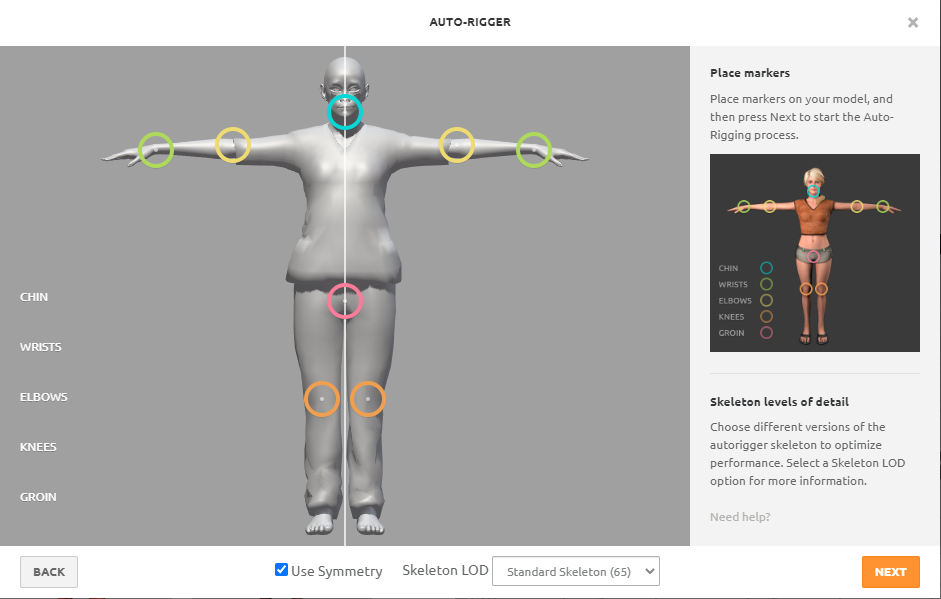 Using Fuse and Miximo is probably the easiest workflow available and probably most popular amongst indie game developers. However, there are YouTube tutorials on character rigging using Blender or Maya. These solutions might be better for less standard skeletons, however might be more time consuming. One thing to mention is that rigging doesn’t apply to facial movements and only focuses on the body including the head. Working out how to animate faces is my next task coming up but before that I’ll have a play around in Unity with animations making my new avatar move :)
So by now I’ve tried a few options for motion capture: optical ‘high-end’ solutions, Rokoko and Neuron Suits. I’ve also tried homemade mocap solutions using Kinect and Blender. Initially, I was interested in how good each of the solutions is and how they compare on the cost front. From the technologies I’ve tried, Neuron and Rokoko seem to be the winners for now. Since I gained a better understanding of technology used for motion capture, I have moved on to learning more about how to apply motion capture data onto an avatar. When the data is initially captured, it pretty much looks like an animated stickman.
This animation then has to be applied onto the avatar (a character in a story or game) and this can be quite difficult to accomplish. Firstly, the avatar has its own skeleton structure which is a simplified humanoid skeleton. To apply the motion capture, the skeleton of the stickman and the avatar have to be matched. From the research I have done so far I can see that there are many different ways of doing this depending on what software you decide to use. A lot of the time motion capture will be first imported into Maya, which is a software specialising in animation, where it will be matched to an avatar. As good as it sounds, the software price makes it out of reach for indie developers. Hence, many other tools and solutions have been developed in order to achieve the same purpose. This can also be accomplished in Unity, which is a game engine design software that enables the creation of 3D environments, enables design of interaction with objects and characters. For now I’ve managed to match a trial avatar that I’ve downloaded with Neuron’s motion capture in Unity. However, it was quite tricky since the bone structures were different between the avatar and the motion capture, resulting with quite a few glitching movements along the way. Consequently, I’ve realised that before I invest more time in creating motion capture it will be better to finalise the avatar that I want to use.. This is simply to avoid myself retargeting motion capture data from the stickman onto the avatar skeleton each time. As with anything, there are many different ways to go about creating an avatar so that’s a topic for my next post ;)
|
AuthorI'm an actress, writer and producer. My mantra: write, perform, repeat. Archives
May 2023
Categories |
 RSS Feed